Table of Contents
Just like a lighthouse guiding ships safely to shore, a well-organized to-do list can steer you through the chaotic sea of tasks and responsibilities.
Enter Notion – a versatile tool that can transform your productivity game. In the following discussion, you’ll learn how to leverage Notion’s features to create a very simple but comprehensive, flexible, and free to-do list.
This isn’t about merely jotting down tasks. It’s about setting up a system that aligns with your workflow and, at the same time, begin getting you familiarized with Notion.
Stick around, and you’ll find out how to navigate this powerful tool to keep your tasks from slipping through the cracks.
What is Notion?
So, what exactly is Notion?
It’s a powerful productivity tool that allows you to create your own digital workspace with pages and blocks.
Let’s get you familiar with these key features and how they can be used to create an effective to-do list.
BTW you can create a free account and begin using Notion using this link:
Notion Workspace
Dive into the world of Notion, a comprehensive workspace where you can create, manage, and customize to-do lists efficiently. Notion is your all-in-one platform where you can jot down ideas, set reminders, and tick off completed tasks.
The Notion Workspace is designed to help you prioritize and organize your work, all in one place. You can create separate pages for different projects, categorize tasks under various headings, and even set deadlines to ensure you’re always on top of things.
Its versatility allows you to tailor your workspace according to your needs. With Notion, you’ll have a clear overview of your to-do list, which makes managing your tasks easier.
Notion Pages
In the realm of Notion, Pages are your versatile building blocks that allow you to structure, organize, and customize your workspace to your heart’s content. Each page can be transformed into a free to-do list, a project tracker, or a personal wiki.
To create a free to-do list, you simply add a new page and start adding tasks. Pages can be filled with text, images, embedded videos, and more. They’re also flexible, enabling you to easily drag and drop tasks, change their order, or nest them within other tasks.
You can even create links between pages, making it easy to navigate your workspace. So, learning how to effectively use Notion pages is the first step towards streamlining your productivity.
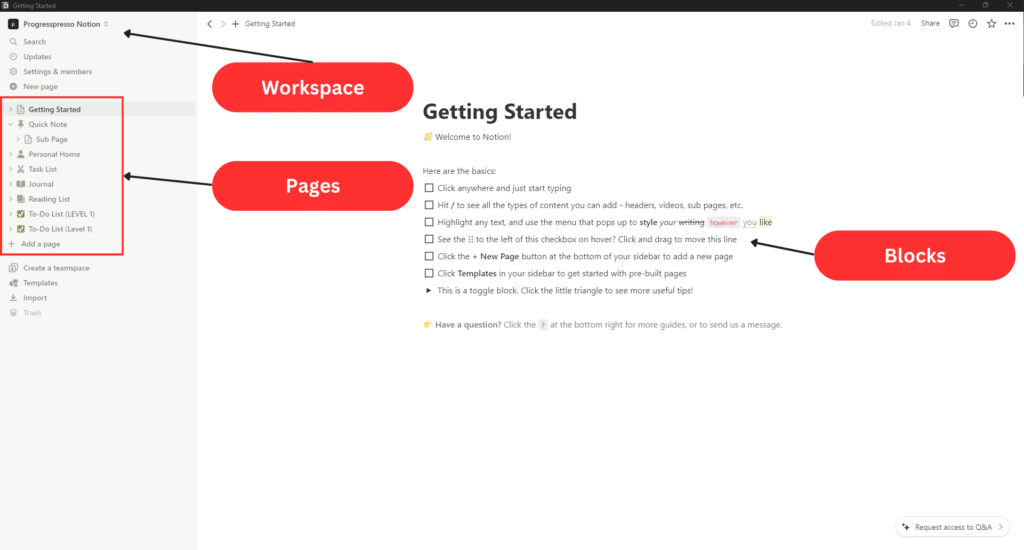
Notion Blocks
Beyond the realm of Notion Pages lies the ingenious world of Notion Blocks, the foundation of creating robust content within the platform. Think of these blocks as the building bricks of your to-do list. They’re versatile and can be text, lists, images, files, embeds, or even databases.
You can move them, customize them, and nest them within each other. Want a checklist under a text block? You got it. Need to insert a table within a toggle list? No problem.
With Notion blocks, you’re no longer confined to linear notes. You can create and manage your to-do list in a way that’s visually appealing and intuitively organized.
How to Build a Free and Simple To Do List with Notion
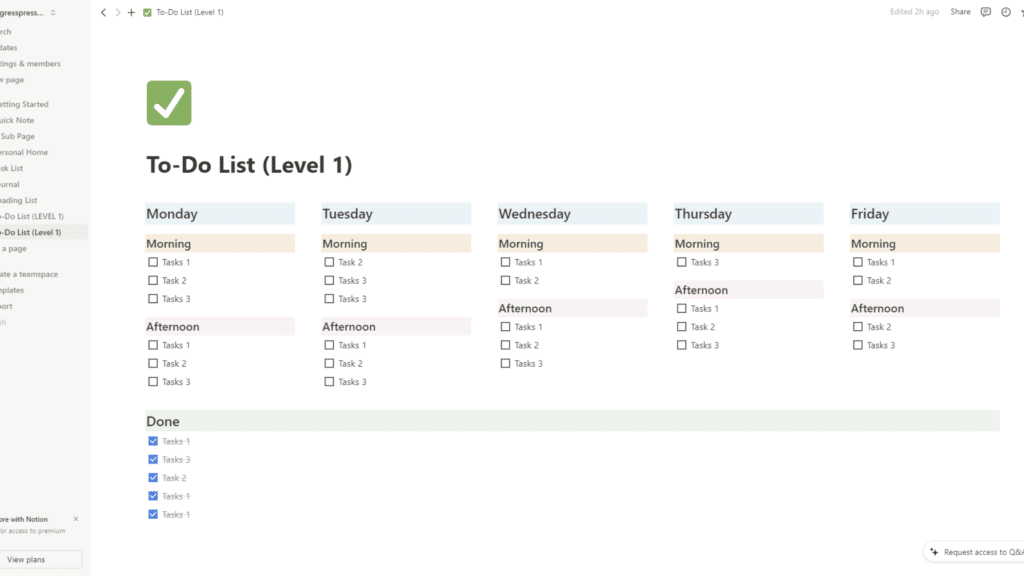
Let’s kick things off by building a simple, or what we’ll call a ‘Level 1’, To-Do List in Notion, perfect for those of you who are just starting out with this versatile tool.
Creating a ‘Level 1’ To-Do List is straightforward.
1 Start by creating a new page in Notion and setting it up as a full-width page. Name it something like ‘My To-Do List’ and choose an icon to personalize it.

2 Next, type out the days of the week and arrange them side by side by turning these blocks into “Columns”. Customize the text to your liking, changing the color and font size as you desire.
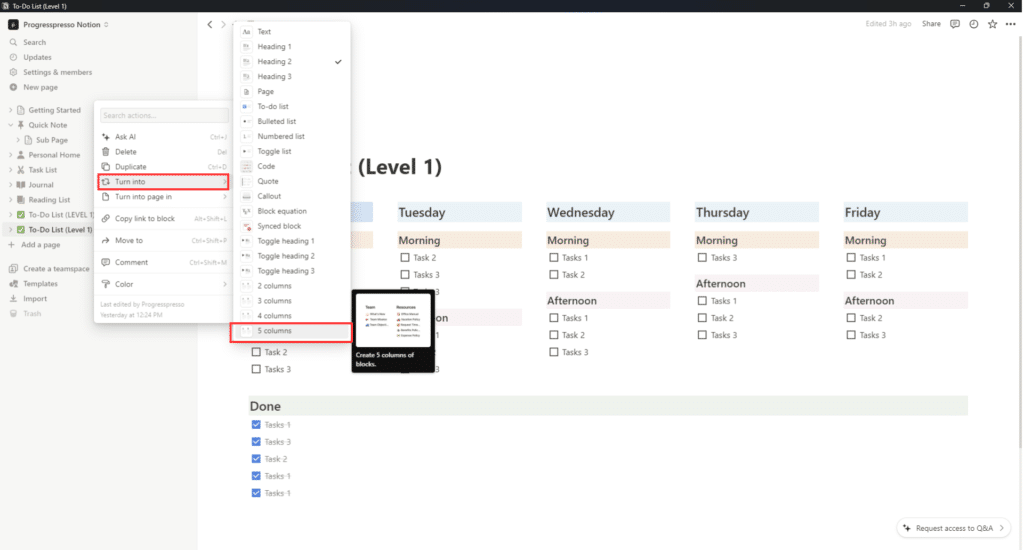

3 To add your tasks, use the forward slash command to create “checklist “to-do” block. You can drag these items between different days as needed.

You can mark tasks as completed by adding a checkbox column and ticking it once the task is done.
4 Lastly, customize it to your liking. You can change colors, add covers, and much more. I like having a “Done” section where I manually drag and drop tasks that I have completed.
As you get more comfortable with Notion, you’ll be able to create more complex and robust to-do lists, or what we’ll call ‘higher level’ lists. But for now, this ‘Level 1’ To-Do List is a great starting point.
It’s all about taking small steps to fully utilize the functionality available in Notion. So get started with this simple To-Do List, and you’ll be a Notion pro in no time.
Conclusion
And there you have it! You’ve now got the know-how to create a free and efficient to-do list in Notion.
Remember, it’s more than just jotting down tasks; it’s about categorizing, setting deadlines, and tracking your progress.
This comprehensive system ensures nothing falls through the cracks.
So, take control of your workload and start ticking off those tasks.
Here’s to a more organized and productive you!



0 Comments